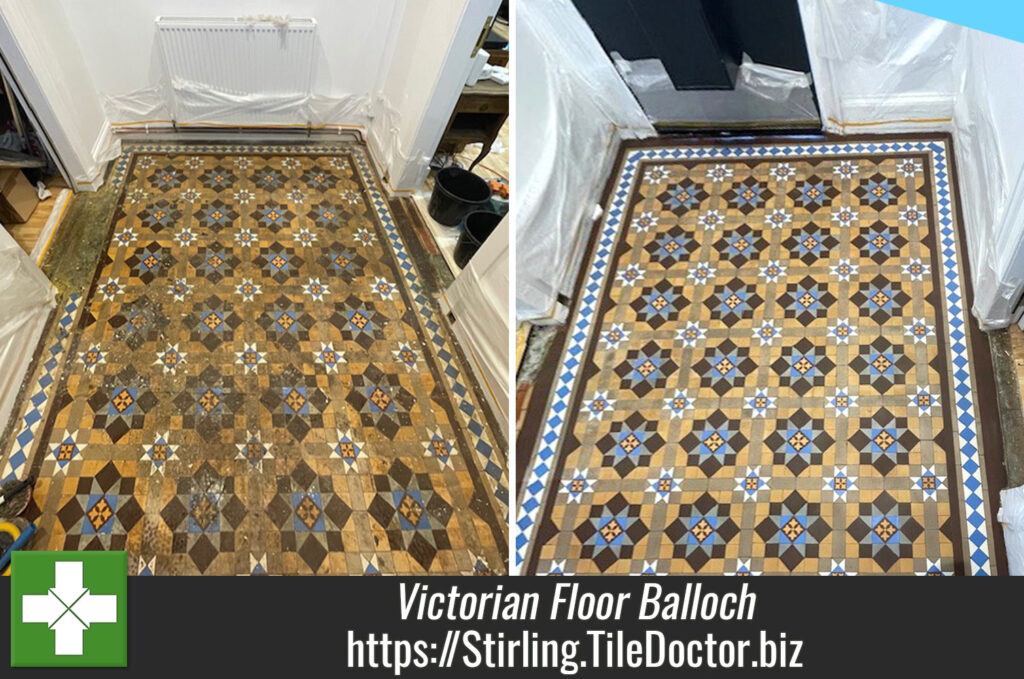
Glue-Stained Victorian Tile Floor Restored at Balloch Loch Lomond
The client in Balloch at the South end of Loch Lomond had purchased a property with a Victorian tiled floor hidden beneath worn carpet in the entrance hall. The property was in the process of being converted into a residential home where my client planned to live.

The Victorian floor was well-preserved however the tiles were obscured by thick, stubborn carpet glue, as well as soiling and a chunk of concrete at one of the doorways. To add to the challenge, two of the tiles were damaged and needed repair. My client had attempted to remove the carpet glue using various cleaners and paint strippers, but none had been effective.

As per usual practice I went over to survey the floor and work out a detailed restoration plan that would transform the entrance hall into a striking focal point of the property. I used the plan to work out a quote which was accepted and a date set for my return.
Cleaning and Repairing a Victorian Tiled Hallway
Work began by focusing on removing the hardened glue by carefully scrapping off as much as possible by hand. Then a mixture of Tile Doctor’s Oxy-Gel and Nanotech HBU Remover was applied and let to sit for twenty minutes. This combination started breaking down the glue, allowing most of what remained to be scraped off, leaving only small deposits. The process was repeated and the floor further scrubbed using a Black pad fitted to a rotary buffer machine to remove the last of the glue and leave the floor clean.
The next task was to remove the cement covering the tiles at one of the doorways, I suspect this had been added to resolve an issue at some point in the property’s long history. The cement was carefully chiselled out to avoid damaging the adjacent tiles. The meticulous nature of this process took approximately 30 minutes to complete, with frequent inspections to check for any tile damage.

Fortunately, the cautious approach ensured that no tiles were harmed. However, a thin layer of concrete remained on the tiles, which was subsequently removed using water and a 200-grit coarse pad fitted to the buffing machine.
Since the floor lacked a damp-proof membrane, the next step was to counter any potential efflorescence (salt issues) trapped in the floor. To accomplish this, Tile Doctor’s Acid Gel was applied by brushing it across the entire floor. The gel was allowed to seep into the tiles for ten minutes, then scrubbed in with a deck brush, adding a little water as we went. Once completed a wet vacuum was used to lift the soiled solution.
Once finished the floor was thoroughly rinsed with water to remove any trace of product or remaining dirt and then vacuumed again. Finally, the floor was left to dry out overnight.

Prior to sealing, we had to repair two tiles. One tile was brown, while the other was white. We used epoxy resin sticks to complete the repairs. To achieve a matching brown colour, we mixed various resin sticks. Fortunately, the white tile repair was straightforward.
Sealing a Victorian Tiled Hallway
The next day, we tested the floor to ensure it was dry enough for the sealer application. Tile Doctors Colour Grow sealer was chosen as it is a tough, water-repellent product that also enhances the tile colour. Two coats were applied forty minutes apart to allow the first coat to fully dry and soak into the tiles.

The work took two days and completely restored the floor back to its original condition much to the client of my client.
For aftercare of sealed floors like this one we recommended the pH-Neutral Cleaner from Tile Doctor which will keep the floor clean without affecting the sealer.
Professional Restoration of a Victorian Tiled Hallway in Sterling
Glue-Stained Victorian Tile Floor Restored at Balloch Loch Lomond Read More »