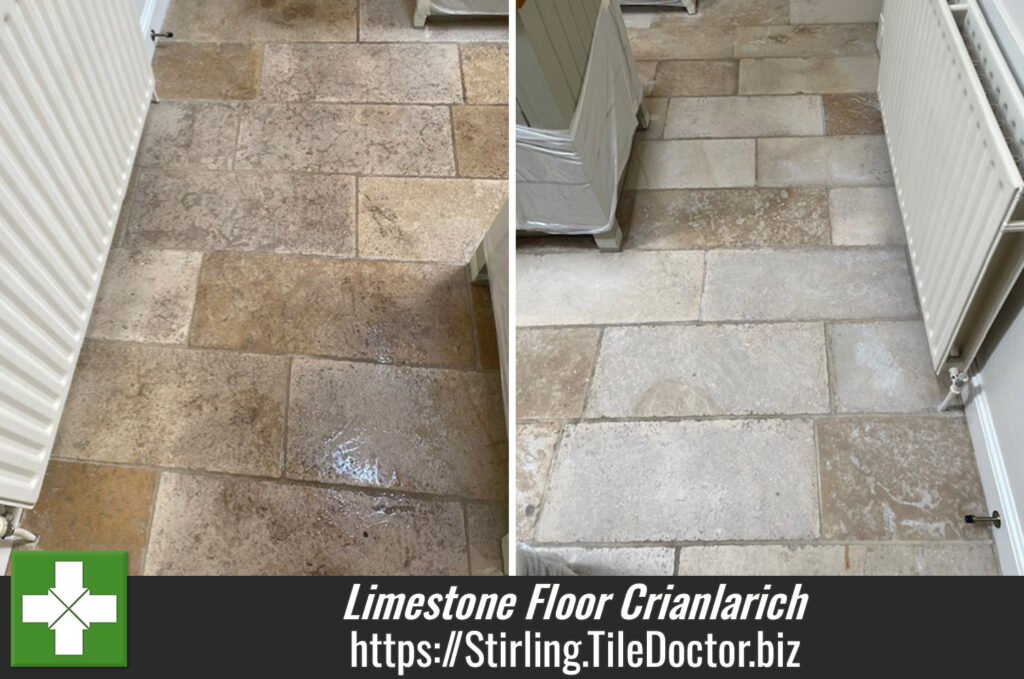
Heavily Soiled Limestone Kitchen Floor Renovated in Crianlarich
Earlier this year I attended a home in Crianlarich to work on a Limestone Kitchen floor. The stone floor was pretty grubby and proving difficult to keep clean. It was clear to me that the sealer that had once protected the stone had been worn away leaving it vulnerable to ingrained dirt. This process happens so slowly you don’t really notice it.

I carried out a small test clean to demonstrate just how bad the problem was and the improvement made by the cleaning was quite a contrast. Impressed by this and now looking forward to a transformed floor I was asked to provide a price for the renovation.
I worked out a quote which included deep cleaning the tile and grout, polishing the Limestone and then sealing the whole floor with a hard-wearing sealer. They were happy to go ahead, and we scheduled a date in for the work, it was only a small area so would not take too long.
Cleaning a Limestone Tiled Kitchen Floor
To get the tile and grout clean I started with a 1 to 4 dilution of Tile Doctor Pro-Clean which was sprayed onto the floor and left to soak in for ten minutes. The dwell times gives the product time to breakdown the dirt and old sealer before being worked into the floor using a Black Scrubbing pad fitted to a rotary buffer machine. The pads are run over each tile multiple times to lift the dirt from the pores of the stone.
After rinsing the tiles and extracting the soiling with a wet vacuum it was time to refine the appearance of the Limestone using a set of diamond burnishing pads of different grits. This process starts with a coarse 400-grit burnishing pad and then repeated with a medium 800-grit pad and a fine 1500-grit pad. The floor is rinsed and extracted after each pad to remove the slurry generated during the process.
The next step was to scrub the grout lines using more Tile Doctor Pro-Clean. I find this is best done manually, as the pads can struggle to reach the recesses of the grout lines. Once complete, the floor was rinsed and extracted multiple times to neutralize it and remove any remaining product.
The floor was then left to dry off overnight.
Sealing a Limestone Tiled Kitchen Floor
On my return the next day work started with the application of the last of the four burnishing pads which is a an extra-fine 3000-grit. This pad further refines the stone and is applied dry to the floor, with only a light misting of water sprayed onto the tile – a process we call a “Spray Burnish”. This leaves the floor nice and dry, and ready for the final step of sealing.
Having discussed sealers and the difference finishes that can be achieved with the customer earlier we had decided upon Tile Doctor Ultra-Seal. This is an almost invisible sealer that leaves the Limestone looking very natural. It works by seeping into the stone, occupying the pores and thereby preventing dirt from becoming ingrained there. This ensures dirt remains on the surface where it can be easily cleaned away. Only two coats of Tile Doctor Ultra-Seal were needed to fully seal the stone, leaving around 30 minutes of drying time between coats.

I think you will agree from the photographs the Limestone floor was transformed by the renovation process and now looks so much cleaner and lighter in colour. The Kitchen now looks much more appealing and inviting much to the delight of my customers.
For the ongoing care of this polished stone floor, we recommend using Tile Doctor Stone Soap. It is a gentle yet effective cleaner that helps maintain the patina without damaging the sealer, ensuring the floor’s finish lasts for a long time.
Professional Cleaning and Polishing of a Limestone Tiled Kitchen Floor in Stirling
Heavily Soiled Limestone Kitchen Floor Renovated in Crianlarich Read More »